You must complete the
Lost Star Destroyer (Pre-quest) prerequisite quest to access this Heroic Instance.
You will
need a group in order to complete this
heroic instance.
This instance has a lockout timer and is repeatable every day!
- Once you enter, the timer starts!
- Do NOT enter the instance until you have a group and are ready!
This instance grants 1 Black Sun Token of Heroism upon completion.
Preparations
Before entering the Lost Star Destroyer, also known as ISD, here is some information on what awaits you.
- Your group will require that someone has a POB or gunship
- This instance is timed at an hour
- After the hour you will be locked out until the daily reset
- This will not be easy - be prepared!
- Highly recommend crafted armor with Skill Enhancing Attachments(SEAs), also known as tapes
- Bring consumables; food and spice
- It is especially important to bring damage mitigation food, such as Exo-Protein Wafers and Synthsteak
- Doctor and entertainer buffs
- If your group happens to wipe, you are able to clone on the Lost Star Destroyer
- If the timer happens to expire, your group will be ejected from the Lost Star Destroyer
- There are four difficulty modes available, the harder the difficulty the better the loot
- Womp Rat (Easy) / Bantha (Normal) / Rancor (Hard) / Krayt Dragon (Nightmare)
Once you are ready, continue to the
How to Enter section.
How to Enter
Once your group is ready, huddle around a Starship terminal at any starport. The group member that has the POB or gunship will need to invite everyone in the group to their ship. Once everyone has accepted, click on
Launch Ship.
After you have launched, open up your hyperspace map (default keybind is
H) and hyperspace to
Ord Mantell. You will notice that there is a lonely Imperial Star Destroyer in the system - that is where you are going.
Fly towards the Imperial Star Destroyer and target the
Hangar. You will need to communicate with this when you get into
close proximity. The default keybind is communicate is
shift + C or you may also enter
/comm in the chat. The pilot may also use the
macro at the bottom of this section.
- Highly recommend approaching the Hangar from below
- Having the IFF scramble pilot ability is also incredibly helpful for this part
When you communicate with the
Hangar, request landing clearance.
- Note: If a group member happens to not have completed the pre-quest, they will be left on behind on the ship
IMPORTANT:
- The boarding process may not work as expected if there are any group members in any of the turrets of the POB or gunship
- It seems that the difficulty selection is assigned to a random group member at the time of boarding - so everyone must be paying attention at the time of boarding
Once you successfully board the Lost Star Destroyer, you and your group will load into the hangar and be given the
Forced Entry! buff. If your pilot was a Master Smuggler, you will instead be given the
Smuggled! buff.
Forced Entry!
Your ship with a crew forced its way aboard the Blackguard.
Damage output modified by 4.00%
Reduce damage taken by 5.00%
Toughness modified by 250.00 points
Smuggled!
You were recently smuggled aboard the Blackguard.
Damage output modified by 7.00%
Reduce damage taken by 6.00%
Toughness modified by 250.00 points
Welcome aboard, the heroic instance has officially started!
Macro
Pilots, use this macro to skip conversation in one click. The same rules apply. You must have the
Hanger targeted and you must be in
close proximity of the hangar.
/conversationStart;
/pause .1;
/npcConversationSelect 0;
/pause .1;
/npcConversationSelect 0;
Encounters
Summary of Instance
Defeat Krix Swiftshadow
In the first encounter, you and your group will need to work together to take down
Krix Swiftshadow and his Blackguard grenadiers.
Use the provided map to help you navigate through the first encounter of the Lost Star Destroyer heroic instance.
- E: Entrance - where you and your group landed
- G: Grenadier
- K: Krix Swiftshadow
The idea here is that one group member will tank Krix Swiftshadow (
K), while the rest of the group will kill the Blacksun grenadiers (
G). To start the encounter, interact with the
Access Controller terminal.
It is highly recommended to have coordination for the Blacksun grenadiers, as they are the threat during this encounter.
- Most groups just go from left-to-right or vice versa
The Blacksun grenadiers will throw grenades at the group and will explode dealing large AoE (
area-of-effect) damage.
Once all of the Blacksun grenadiers have been dealt with, the entire group should shift their focus to Krix Swiftshadow (
K) and take him down. Once Krix Swiftshadow is taken down, you may proceed to the next section of the Lost Star Destroyer.
Tips:
- Store all familiars, droids, and pets during this encounter
- All three of these will increase the frequency of the grenades - more damage to the group
- In the misc section of the options, turn on Show all objects- this will let you see where the grenades are
- If you are far enough from the grenade, it will deal drastically less damage or zero damage entirely
Squadleader and Dark Troopers
After progressing into the Lost Star Destroyer, you will eventually hit a force wall and a hologram of Cmdr. Kenkirk. To get past this force wall, you must find and kill the Blackguard squadleader.
Use the provided map to help you navigate through the second encounter of the Lost Star Destroyer heroic instance.
- CK: Cmdr. Kenkirk hologram
- S1 - S5: Spawn locations of Blackguard dark troopers and squadleader
The goal here is to kill Blackguard dark troopers until the Blackguard squad leader spawns. The Blackguard dark troopers will spawn in sets of three split between the spawn locations (
S1 -
S5) on the map.
Speak with the hologram of Cmdr. Kenkirk (
CK) to start the encounter.
After killing four sets of the Blackguard dark troopers, the Blackguard squadleader will spawn at one of the spawn locations.
- The Blackguard squadleader is a CL82 Boss level NPC
Once you take them down, the force wall where you interacted with Cmdr. Kenkirk (
CK) will deactivate, and you may continue to the next section of the Lost Star Destroyer.
Tips:
- This encounter is pretty simple, stay out of melee range if you are a ranged character
- The Blackguard dark troopers have pretty strong melee abilities
Dark Troopers
After getting past the force wall where the hologram of Cmdr. Kenkirk was, you will next section of the Lost Star Destroyer, where you will be blocked by a force wall again. This encounter is pretty similar to the previous one.
Use the provided map to help you navigate through the third encounter of the Lost Star Destroyer heroic instance.
- S1 - S3: Spawn locations of Blackguard dark troopers
The goal here is to kill three waves of the Blackguard dark troopers that will spawn in sets of three at the spawn locations (
S1 -
S3) on the map.
Once you take down the three waves of Blackguard dark troopers, the force wall behind one of the spawn locations (
S2) will deactivate, and you may continue to the next section of the Lost Star Destroyer.
Tips:
- This encounter is pretty simple, stay out of melee range if you are a ranged character
- The Blackguard dark troopers have pretty strong melee abilities
- What a lot of groups do is stand in the corner behind the S1 spawn location and one group member will pull the Blackguard dark troopers from the S2 and S3 spawn locations and then run back to the corner behind the S1 spawn location
- This way all three Blackguard dark troopers will be able to be attacked at once with area-of-effect (AoE) attacks
Defeat Watch Captain Prat
From the previous encounter, you will enter a large hangar. Make your way through this hangar until you reach a hallway to your right. Continue down the path until you enter a rectangular room where you will once again hit a force wall and a hologram of Cmdr. Kenkirk. To get past this force wall, you must kill
Watch Captain Prat.
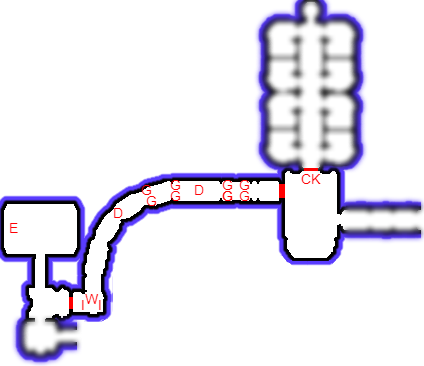
Use the provided map to help you navigate through the fourth encounter of the Lost Star Destroyer heroic instance.
- Red arrow: Direction you will be coming from, from the previous encounter
- CK: Cmdr. Kenkirk hologram
Speak with the hologram of Cmdr. Kenkirk (
CK). This will cause the force wall to the left of the hologram to vanish. Refer to the next map for the remainder of the encounter.
- CK: Cmdr. Kenkirk hologram
- G: Grenadier
- D: Dark trooper
- W: Watch Captain Prat
- I: IT-O Interrogator droid
- E: Engineer
Once the force wall vanishes, multiple NPCs will spawn:
- 8 Blacksun grenadiers (G)
- 2 Blacksun dark troopers (D)
- Watch Captain Prat (W)
- 2 IT-0 Interrogator droids (I)
You and your group will need to clean out the hallway of the Blacksun grenadiers (
G) and Blacksun dark troopers (
D) .
- It is highly recommended to pull as few NPCs as possible from the hallway
Once all of the Blacksun grenadiers (
G) and Blacksun dark troopers (
D) are taken care of, you will see Watch Captain Prat (
W) and 2 IT-0 Interrogator droids (
I) at the end of the hallway.
You and your group will need to fight Watch Captain Prat (
W) and the 2 IT-0 Interrogator droids (
I) at the same time. Refer to the
tips section for strategies for the encounter.
Once Watch Captain Prat (
W) has been taken out, a group member will need to converse with the engineer (
E), who will then walk back into the rectangular room where you and your group came from. The engineer (
E) will unlock the elevator that is on the opposite side of where the hologram of Cmdr. Kenkirk (
CK) was.
Go down this elevator to continue to the next section of the Lost Star Destroyer.
Tips:
- A common strategy is for the tank to focus on Watch Captain Prat (W) while the rest of the group works on the IT-0 Interrogator droids (I)
- Ideally, the whole group focuses on a single IT-0 Interrogator droid (I) at a time
- Once both IT-0 Interrogator droids (I) are down, the whole group should focus on Watch Captain Prat (W)
- The IT-0 Interrogator droids (I) apply debuffs to all players close to them - if you are ranged, there is no reason to be near these droids
- Debuffs:
- Diseased - Your action is reduced due to disease
- On Fire - You are losing health due to being On Fire
- Thyroid Rupture - Modify combat speed by -40.00 points
Blacksun Boarders
After you have taken the elevator, that the engineer unlocks from the previous encounter, you will need to kill all Blacksun Engineers and Boarders so that the engineer can unlock a force wall on the upper level.
- Blacksun Engineers are CL80 Elite level NPCs and do not pose much danger
- Blacksun Boarders are CL80 Boss level NPCs and are very dangerous
- They are melee, do a lot of area-of-effect (AoE) damage, and debuff
- Stay at least 8 meters away from them if you are ranged - the further the better
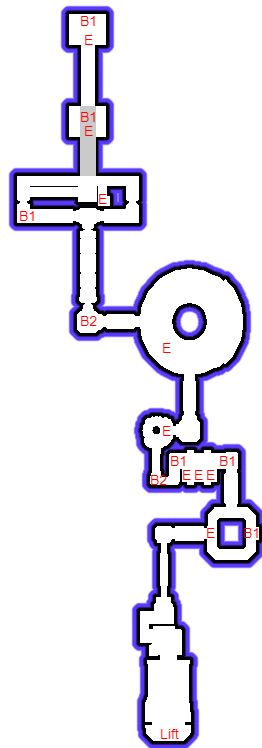
Use the provided map to help you navigate through the fifth encounter of the Lost Star Destroyer heroic instance.
- Lift: Elevator - starting point
- E: Blacksun Engineer
- B1: Blacksun Boarder (already spawned)
- B2: Blacksun Boarder (will spawn)
You will start by entering the area from the elevator (
Lift). Make your way through the lower level until you hit a square room, where you will encounter your first Blacksun Engineer (
E) and Blacksun Boarder (
B1). Take them out before proceeding.
- There are 2 more Blacksun Boarders (B1) that roam from a rectangular-room to the square-room
- It is not recommended to fight all 3 Blacksun Boarders at once, if possible
Take out the 2 roaming Blacksun Boarders (
B1) if you haven't already, before taking out a group of 3 Blacksun Engineers (
E) in a rectangular-room. Once the Blacksun Engineers (
E) are down, a Blacksun Boarder (
B2) will spawn in the corner of a hallway that leads to a smaller circular-room. Take him out before proceeding.
After you have cleared the Blacksun Boarder (
B2) that spawned, kill the lonely Blacksun Engineer (
E) in the
smaller circular-room. You will notice the next room is a larger circular-room with another Blacksun Engineer (
E).
- If you hug the right side of the larger circular room and avoid getting into combat with the Blacksun Engineer (E), you will skip the next spawn of Blacksun Boarders (B2)
- If you do get into combat with the Blacksun Engineer (E), 3 Blacksun Boarders (B2) will spawn in the corner of the hallway with a delay in between each spawn - it is recommended to fight in the larger circular-room since there is a lot more room
After you have defeated the 3 Blacksun Boarders (
B2), or managed to skip them, continue down the hallway to the final area. There will be 1 Blacksun Boarder (
B1) roaming around the rectangular area. Kill him before continuing to a catwalk-like area.
In the catwalk-like area, there will be:
- 1 lonely Blacksun Engineer (E)
- 1 set of a Blacksun Engineer (E) and a Blacksun Boarder (B1) on the top-level
- 1 set of a Blacksun Engineer (E) and a Blacksun Boarder (B1) on the bottom-level
Simply clear out these 3 groups and make your way back to the elevator (
Lift) where you started, and take it back up which will lead you to the next section of the Lost Star Destroyer.
- If you managed to avoid combat with the Blacksun Engineer (E) in the large circular-room, you do not need to hug the wall again - you can run past him and continue towards the elevator (Lift)
- They will chase you, but you can kill them at the elevator (Lift)
Tips:
- Ranged characters and healers stay far away from the Blacksun Boarders
- Try to avoid fighting multiple Blacksun Boarders at once - they hurt
- If possible, try to avoid getting into combat with the Blacksun Engineer in the large circular room
- Doing so will skip a fight with 3 Blacksun Boarders
Defeat Cmdr. Kenkirk
After you have taken the elevator back up, you will notice the hallway directly across from you is now accessible and not longer has a force wall blocking your path. The next encounter is taking down
Cmdr. Kenkirk.
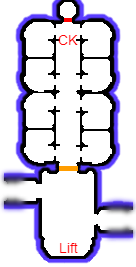
Use the provided map to help you navigate through the sixth encounter of the Lost Star Destroyer heroic instance.
- Lift: Elevator
- CK: Cmdr. Kenkirk
- Orange Bar: Force Wall
- Red Bar: Force Wall
You will see Cmdr. Kenkirk (
CK) waiting at the end of the hallway directly across from where you took the elevator (
Lift). You and your group will all need to enter this hallway
before initiating combat. Once someone attacks Cmdr. Kenkirk (
CK), the encounter starts and a Force Wall (
Orange Bar) will appear. Refer to the
tips section for strategies for the encounter.
Once Cmdr. Kenkirk (
CK) has been taken out, the Force Wall (
Red Bar) that was behind Cmdr. Kenkirk (
CK) will disappear, granting your group access to another elevator.
Take this elevator to continue to the final section of the Lost Star Destroyer.
Tips:
- Make sure the entire group is inside the hallway before attacking Cmdr. Kenkirk
- Failure to do so can result in group members being locked out of the fight
- A common strategy is to tank Cmdr. Kenkirk (CK) at his location where he spawns
- Cmdr. Kenkirk (CK) has many area-of-effect (AoE) abilities, if you are a ranged character you have no reason to be near your group's tank
Defeat Grand Admiral Sait
WIP
Use the provided map to help you navigate through the seventh, and final, encounter of the Lost Star Destroyer heroic instance.
- E: Elevator
- GAS: Grand Admiral Sait
Boss Statistics
Difficulty:
Womp Rat (Easy) /
Bantha (Normal) /
Rancor (Hard) /
Krayt Dragon (Nightmare)
Krix Swiftshadow
Inhabits
- Planet: Ord Mantell System
- Area: Lost Star Destroyer
Basics
- Natural CL: ?? / 81 / ?? / ??
- Health: ?? / 100,686 / ?? / ??
- Aggressive: Yes
- Deathblows: Yes
- Difficulty: Boss
Attacks
Loot
| Difficulty Mode | Possible Loot |
|---|
| Womp Rat (Easy) | |
| Bantha (Normal) |
- 225 - 250 Melee/Ranged Augmentations
- 25 - 30 Melee/Ranged Enhancements
- Champion's Jewelry
- Schematic for Acidic Paragon Vibro Axe [One-time use]
- Schematic for Black Sun Bracer [One-time use]
- Star Destroyer Space Beacon
|
| Rancor (Hard) |
- Schematic for Acidic Paragon Vibro Axe [One-time use]
|
| Krayt Dragon (Nightmare) |
- Schematic for Legendary Acidic Paragon Vibro Axe [One-time use]
|
Watch Captain Prat
Inhabits
- Planet: Ord Mantell System
- Area: Lost Star Destroyer
Basics
- Natural CL: ?? / 83 / ?? / ??
- Health: ?? / 186,489 / ?? / ??
- Aggressive: Yes
- Deathblows: Yes
- Difficulty: Boss
Attacks
Loot
| Difficulty Mode | Possible Loot |
|---|
| Womp Rat (Easy) | |
| Bantha (Normal) |
- 225 - 250 Melee/Ranged Augmentations
- 25 - 30 Melee/Ranged Enhancements
- Champion's Jewelry
- Schematic for Whistler Carbine [One-time use]
- Schematic for Black Sun Belt [One-time use]
|
| Rancor (Hard) |
- Schematic for Whistler Carbine [One-time use]
|
| Krayt Dragon (Nightmare) |
- Schematic for Legendary Whistler Carbine [One-time use]
|
Cmdr. Kenkirk
Inhabits
- Planet: Ord Mantell System
- Area: Lost Star Destroyer
Basics
- Natural CL: ?? / 84 / ?? / ??
- Health: ?? / 189,831 / ?? / ??
- Aggressive: Yes
- Deathblows: Yes
- Difficulty: Boss
Attacks
Loot
| Difficulty Mode | Possible Loot |
|---|
| Womp Rat (Easy) |
- Schematic for Black Sun Gloves[One-time use]
|
| Bantha (Normal) |
- 225 - 250 Melee/Ranged Augmentations
- 25 - 30 Melee/Ranged Enhancements
- Champion's Jewelry
- Schematic for Black Sun Leggings [One-time use]
- Schematic for P-8 Lamprey Pistol [One-time use]
- Star Destroyer Solar Console
|
| Rancor (Hard) |
- Schematic for P-8 Lamprey Pistol [One-time use]
- Star Destroyer Solar Console
|
| Krayt Dragon (Nightmare) |
- Schematic for Legendary P-8 Lamprey Pistol [One-time use]
|
Grand Admiral Sait
Inhabits
- Planet: Ord Mantell System
- Area: Lost Star Destroyer
Basics
- Natural CL: ?? / 85 / ?? / ??
- Health: ?? / 192,223 / ?? / ??
- Aggressive: Yes
- Deathblows: Yes
- Difficulty: Boss
Attacks
Loot
| Difficulty Mode | Possible Loot |
|---|
| Womp Rat (Easy) | |
| Bantha (Normal) | |
| Rancor (Hard) | |
| Krayt Dragon (Nightmare) | |