So you want to eat some food
Food is one of the most important aspects of PvP when it comes to keeping yourself alive, full of action, and on target. This will be a short intro to the food buffs that are currently popular in R3 as well as some related information on food fill, when to use food, and some helpful macros to manage foods. With the wide variety of options for food and drink in game, you may find that some other foods not mentioned here work better for you.. Experimentation is part of the fun!
Along with foods it is a good idea to load up on some other consumables to make your PvP journey more successful such as spice, healing stims, and attribute bonus stims. Be sure to stop by your favorite Entertainer and Doctor for their buffs as well.
PvP Food & Buffs
Food & Drink
Foods
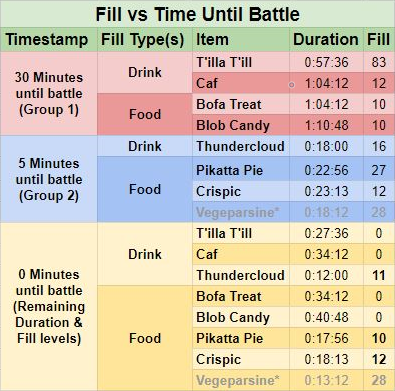
Blob Candy - This is one of the must haves for most combat activities. With a duration in the hour range and low fill, this should be part of your primary food buff set.
Example stats - Action Regen +192, Duration 1:10:48, Filling 10, Uses 9
Bofa Treat - Another long lasting boost with low fill, add it to the cart.
Example stats - Health Regen +192, Duration 1:04:12, Filling 10, Uses 9
Pikatta Pie/Air Cake - These are lumped together due to being the same benefit. You can only use one of these at a time, depending on your situation it may be useful to have both on hand.
Example stats Air Cake - Dodge Bonus +38.39, Duration 17:24, Filling 10, Uses 7
Example stats Pikatta Pie - Dodge Bonus +56.52, Duration 22:56, Filling 27, Uses 7
Crispic - Ranged or Melee builds will benefit from crispic. With a medium duration and low fill, this will help your weapon accuracy.
Example stats - Ranged Accuracy +40, Melee Accuracy +34, Duration 23:13, Filling 12, Uses 9
Vegeparsine - Medium duration, medium fill. This is useful if you expect to come up against melee profession characters. If not, worth skipping to save fill for the next food.
Example stats - Melee Defense +103, Duration 18:12, Filling 28, Uses 6
Exo-Protein Wafers - Low fill, short duration, but a game changer. This food you should have access to on your toolbar, and would be a worthy choice to set on a macro for high intensity situations. With a duration only around ## you have to be on top of things to keep it up. I will include a macro for this to auto-apply the wafers for around 2 minutes at a time.
Example stats - (Damage) Mitigation Bonus +28.8, Duration 0:24, Filling 5, Uses 8
Synthsteak - Similar to the Exo-Protein Wafers, these do the same damage mitigation with a higher bonus, but much higher fill. Worth looking into for extreme situations, but know you will run out of room quickly in your character fill.
Example stats - (Damage) Mitigation Bonus +43.6, Duration 0:41, Filling 27, Uses 7
Drinks
T’illa T’ill - Very high fill long duration drink that should only be used if you have some time before your next engagement. With a fill of 83 this will take about 25 minutes to wear off leaving you with 30+ minutes of benefit, and room to use some of the shorter duration momentary drinks that will be listed below.
Example stats - Stamina +204, Precision +40, Duration 57:36, Filling 83, Uses 21
Caf - Long duration low fill, this is a primary buff set item.
Example stats - Health +192, Mind Regen +100, Duration 1:04:12, Filling 12, Uses 21
Ruby Bliel - A must for stim users. The fill of this is why waiting for T’illa T’ill to settle is necessary. Downing this drink will make your stim available to use if it is on cooldown.
Example stats - Stimpack Roundtime +30, Duration 13:36, Filling 13, Uses 30
Elshandruu Pica Thundercloud - A must have for nearly any PvP engagement. This medium duration, low fill drink will boost your ranged defense quite a lot.
Example stats - Ranged Defense +104, Duration 18:00, Filling 16, Uses 21
Deuterium Pyro - This is the other momentary use drink with a low duration and somewhat low fill. For 40 or so seconds it will boost your ranged accuracy by over 200 points, ensuring your shots get to where you’re sending them.
Example stats - Ranged Accuracy +230, Duration 0:48, Filling 16, Uses 21
Corellian Ale - This is the melee user's counterpart to Deuterium Pyro with the same goal in mind. Huge temporary boost to melee accuracy for nearly a minute.
Example stats - Melee Accuracy +220, Duration 0:50, Filling 16, Uses 18
Food & Drink Fill
The fill mechanic is what is stopping everyone from spamming all the buffs they can all of the time. Each food or drink fills its respective bar in your character sheet to a maximum of 100%. The fill section of any food or drink fills to the associated % listed.
Example: Blob Candy shows a fill of 10, this will fill your food fill meter by 10%.
Once you get near enough to 100% full that your next food item would put you over the threshold, you are too full to eat/drink that! You will have to wait for the fill to wear off, as it does over time.
Fill wears off 1% for food and drink every 18 seconds. This equates to 30 minutes to wear off 100% of food and drink. Both fill bars reduce simultaneously.
Spice, Stims, & Other Buffs
In addition to foods, you will want to add a few other consumable components to your buff package for maximum effect. The following sections will touch on the wide world of non-food related buffs that you can get your hands on without too much difficulty.
Spice
First off, pay your local smuggler a friendly visit in whatever hovel they fence their goods to get your hands on some questionable body altering chemicals - Spice! There are a horde of different options to choose from all with strong benefits and one drawback. Other than the statistical downside that each spice will have, you also need to be aware of the spice downer you will experience 15 minutes after consumption which greatly impacts your ability to fight efficiently. Try to time your downers for safer areas to avoid being taken advantage of. That being said, here are the two typical spice options to look for when preparing for combat.
Neutron Pixie - This is the option you will want to go with if you are not heavy on mind usage. One quick poke of this hallucinogen will provide you with a huge boost of the primary combat pools,
+20% Health, +20% Health Regen, +20% Action Regen, and -20% Mind Regen.
Booster Blue - A potentially better option for those focused on healing others, this has the benefit of
+20% Health, -20% Health Regen, +20% Action Regen, and +20% Mind Regen.
Kliknik Fortitude Enhancer - If you can get your hands on some of this, you will be able to have many of the benefits of spice without the stat downside. Looted off of Klikniks in the Geonosian Caves of Yavin IV. This takes the same buff slot as spice with the same downer after 15 minutes but provides
+10% Health, +20% Health Regen, +20% Action Regen, and +10% Mind Regen.
Stims
As mentioned earlier it is a good idea to have Instant Stimpacks on hand for tough situations. Some combat builds even skip the advanced medic trees and rely on stimpacks for their main healing. Other than the healing variety there is also a selection of looted stimpacks that buff your primary attributes. These drop in quantities of 3 use stacks and can stack with stims of the same type and level. Good to have on hand as they will work with all foods and spices, there are however some quest reward buffs that share the same buff slot. You will get a message on screen if you have a conflicting item, so no worries about wasting stims.
Instant Stimpack - D - This is what you want for those last second heals.
Example stats - 1210 Healing Power, 21 Uses
Looted Stims - With a wide variety of level requirements and attribute bonus amounts, it is best to find the highest level stims possible. These drop from practically any mob in the game, so it is good to start a collection. Available in increments of +5 to +45 bonuses, you can find stims for the following attributes; Agility, Constitution, Luck, Precision, Stamina, and Strength. All looted stims last for 5 minutes.
Other Buffs
Of the many quest reward items that provide buffs I wanted to point out three specific ones. The first two are from the legacy quest, and you may already have. The third is a newer addition that is available with tokens from city invasions.
Infrared Electrobinoculars - This is a minor buff that stacks with practically everything and lasts 30 minutes. While the enhancement is small, there is no limit to the usage which makes these good to keep on hand. These are a reward from the Repo Man quest from Watto’s portion of the legacy quest on Tatooine. For 30 minutes at a time these provide +5 Strength, +5 Precision, and +10% Chance of Detecting Stealthed Enemies.
Selonian Personal Shield Generator - Another item from the legacy quest series, this time from Gather the Missing on Talus. This personal shield generator will give you a short 3 minute duration buff that takes up the same slot as looted stims but with two stats. With a reuse time of 60 minutes this is not necessarily a game changer, but with its unlimited use it is worth hanging on to. This will provide +30 Agility and +30 Constitution, similar to using two combat level 50 stims simultaneously.
Tactical Electrobinoculars - Lastly these electrobinoculars can help pack a serious punch by providing a short buff called Tactical Overlay that increases all the damage you do by 5% for 10 seconds. This doesn’t seem like much, but it is on a 3 minute cooldown with unlimited uses. These can be purchased from the Rebel Recruiters for 1000 tokens.
Buff groupings & Macros
These buff groups will be arranged in a “countdown to battle” type organization with the goal to make it to your desired engagement time with the least amount of fill possible with your full stack of food buffs. This is a simple way to group together these buffs, but there are slight adjustments possible to maximize the duration remaining at “0 Minutes to battle” by being very familiar with the food and drink fill mechanic. I will outline the optimal duration order in the closing notes.
Primary buff group - 30 Minutes to Battle
If you have the time to prepare this much, now is the time to consume the following,
T’illa T’ill - Bofa Treat - Blob Candy - Caf
This will get you the foundation of your buff package, with added health, health regen, action regen, mind regen, stamina, and precision. These are all around 60 minutes in duration.
Secondary buff group - 5 Minutes to Battle
This is when to consume the medium duration buffs you have prepared such as,
Elshandruu Pica Thundercloud - Pikatta Pie - Crispic - Vegeparsine*
*Vegaparsine is only required if you expect to take melee damage.
Pikatta Pie Vs Air Cake - Pikatta Pie has a longer duration by about 6 minutes, more dodge bonus, and more fill. The difference in fill in our examples is 17, which works out to about 5 minutes worth of time burning off the extra fill for a net gain of 1 minute more use time and 18 more dodge bonus.
Mid battle food/drink
These are the food and drink that require the timing above to maximize the amount of fill available to you during a fight. Primarily you will be downing some sort of mitigation food (Exo Protein Wafers or Synthsteak), your Ruby Bliel, and Deuterium Pyro. Here are some notes on when/how to use each.
Exo-Protein Wafers vs Synthsteak - For longer battles you will be best served by using the Exo-Protein Wafers due to the lower fill. By comparison for each Synthsteak(27 fill) you could use lasting 41 seconds, you would be able to use 5 Exo-Protein Wafers(5*5=25 fill) lasting a total of 2 minutes. For this reason, stocking up on wafers is typically the way to go.
Conversely, to go for a quick overwhelming fight such as taking out a bounty target or hunter, the additional 15 mitigation gained from the synthsteak could make the difference.
Ruby Bliel - This will get you out of some tight spots if you have stimpacks to heal yourself with. While your stim is on cooldown, popping this drink will allow you to immediately use your stimpack again. With a fill of 13, this will fill you up fairly quickly if over abused. It is also a tactic of some to monitor a single opponent's drink fill to know when they are not able to use their Ruby Bliel to save them - at this time you may be able to press your advantage with the following mid battle drink.
Deuterium Pyro/Corellian Ale - With an additional 230 ranged accuracy or 220 melee accuracy, you will find it much easier to hit your target and pile the damage on. The fill is moderate at 16 and lasts 48-50 seconds, but plenty of time to chain your abilities together for maximum impact.
Macros
To use macros for groups of buff foods you will need to put them on a toolbar for easy access. I use toolbar pane 3 for mine as it leaves panes 6, 1, & 2 available for combat abilities and macro shortcuts.
Toolbar naming convention - To make a macro that uses slots on your toolbar you will have to identify which toolbarPane to draw from then which toolbarSlot. The toolbarPanes are numbered from 00 to 05, while the toolbarSlots are numbered 00-23.
Example - To jump to toolbar 3 and select slot 4 the text would be;
/ui action toolbarPane02;
/ui action toolbarSlot03;
Now that we have the macro text established, here are my example macros for each buff group. In order from left to right on the bottom of my toolbar 3 I have - T’illa T’ill, Caf, Blob Candy, Bofa Treat, Elshandruu Pica Thundercloud, Pikatta Pie, & Crispic. I put the macro icons on one of my secondary toolbars so I can jump to it, hit the button to get the foods consumed and automatically back to my primary toolbar.
Buff Group 1 -
/ui action toolbarPane02;
/pause .1;
/ui action toolbarSlot12;
/pause .1;
/ui action toolbarSlot13;
/pause.1;
/ui action toolbarSlot14;
/pause .1;
/ui action toolbarSlot15;
/pause .1;
/ui action toolbarPane00;
Buff Group 2 -
/ui action toolbarPane02;
/pause .1;
/ui action toolbarSlot16;
/pause .1;
/ui action toolbarSlot17;
/pause .1;
/ui action toolbarSlot18;
/pause .1;
/ui action toolbarPane00;
Wafer Macro - This macro I have on my main toolbar, it uses the wafers I place also on that toolbar in slot 21 to keep a consistent mitigation buff active for 2 minutes at a time with a tell to myself 2 seconds before the last wafer expires as a reminder to restart macro if desired. Here is the macro;
/ui action toolbarSlot21;
/pause 24;
/ui action toolbarSlot21;
/pause 24;
/ui action toolbarSlot21;
/pause 24;
/ui action toolbarSlot21;
/pause 24;
/ui action toolbarSlot21;
/pause 22;
/t (Your character name here without parentheses) Buff stop 2 seconds;
Closing notes
With whatever foods you have the macros above can be adjusted for timing, or to utilize the foods in a different way. I also have a macro similar to the buff group macros to dump all the foods in at once plus a spice incase of bounty hunter(s) omitting the T’illa T’ill. Using the above macros as examples, you should have no problem modifying and creating your own macros to include spice, buff stims, legacy quest reward buffs, and whatever else you can get your hands on to increase your odds in PvP. Food examples are all Suma’Eats products and are representative of the current best options for each buff that I am aware of.
As mentioned in the Buff groupings & Macros section, here is the timing to maximize duration in our 30 minute to battle buff example.
30 Minutes to go -T’illa T’ill
11 Minutes to go - Bofa Treat & Blob Candy (Fill still falls to 0 before next foods eaten, increasing useful duration of these by 19 minutes.)
5 Minutes to go - Caf, Thundercloud, & Pikatta Pie (No change for the Pie or Thundercloud, but pushing the Caf to this buff window increases useable duration by 25 minutes.)
0 Minutes to go - Spice, Buff Stims, Crispic (Since the fill of Crispi has not worn off in the normal buff groups timing, it is possible to wait until the last minute to use this food and have the same 22 food fill at 0 Minutes as the simple buff groups with an additional 5 minutes of usable time.)